
- How to open an audio file
- How to play a sound or its fragment
- How to add a new annotation layer
- How to add an annotation boundary (segment)
- How to add annotation text (label)
- How to delete a segment, several segments or a whole layer
- How to modify order and height of annotation layers
- How to copy (duplicate) a whole layer
- How to switch on/off the Waveform or Spectrogram display
- How to annotate with the use of the Graphical Feature Space
- How to import a layer from a text file
- How to import a layer from a spreadsheet (or a CSV file)
- How to export a layer or all layers to a spreadsheet
- How to save and open annotation
- How to create a Workspace that includes a collection of annotation files
How to open an audio file

Click the Open icon in the button bar or use the File / Open menu. Annotation Pro opens mono and stereo wave files. After opening a file, the file name is shown at the top of the programme’s window (with a small musical note on the left denoting the sound file). In the main window of the programme we can see the waveform of the sound file.
How to play a sound or its fragment

In order to play an audio file click the Play button in the Audio bar or strike the keys Ctrl + Space. When we click the same button for the second time, the playback will stop. In order to play a selected fragment of an audio file you need to use the left mouse button and select (click and drag) the desired fragment on the Waveform, the selection will be highlighted in blue color. At the bottom of the blue highlighting you can see the exact duration of the selection. Now press Play (or Ctrl + Space) to listen to the selection.
How to add a new annotation layer

When you start the programme you will see only one annotation layer, named Layer1. You can immediately start annotation using this layer. If you need more layers you can add them using the Add New Layer button in theAnnotation bar (the middle of the programme’s window). You can add any number of new layers. The layers are automatically numbered and are displayed in different colours. You can modify the names and colours of your layers in the Properties panel (right side of the programme’s window). A newly added annotation layer becomes automatically highlighted (blue border).
How to add an annotation boundary (segment)

The basic annotation unit in Annotation Pro is a Segment (the white rectangle in the picture above, a text field). When you want to insert a new segment, you can either use Insert Segment in the Annotation bar or the Insert on your keyboard. The Segment will be inserted at the mouse cursor position (thin blue line). In case when a part of (or the whole) audio file has been selected (highlighted by left-click and dragging on the sound display), the new segment will be automatically inserted according to the selection. The Segment’s length can be modified by left-clicking and dragging the left or right boundary of the Segment. The cursor will automatically go to the end of the segment and the segment will become highlighted (blue border). In order to move a segment to another location in the annotation layer (or to a different layer) you can drag it after left-clicking somewhere on the middle of the segment.
How to add annotation text (label)

Click on the segment (so that it becomes highlighted with the blue border) and start typing on your keyboard. The spaces are displayed as dots. In order to remove a text, use the Backspace key on the keyboard. For more options in the text edition, you need to open the Properties panel (right side of the programme’s window, button in the top right corner) and modify the text in the Label field (Segment tab) using the keyboard.
How to delete a segment, several segments or a whole layer

In order to delete a segment you need to select it (click on it, a blue border appears) and then click the Delete button in the Annotation bar or Delete key on the keyboard, and confirm. The selected Segment will be deleted. If you want to remove several segments, first select them all together by clicking each of them and pressing the Ctrl key on the keyboard at the same time. This way you can add new segments to selection. The click Delete and confirm the operation. Each change can be undone by using the Ctrl+Z keys combination. When you need to remove a whole layer, you need to click the mouse on an empty space on the layer (no segment) or on the layer’s name (left end of the layer). The selected layer will be highlighted with a blue border. When selected, remove the layer in a similar way as with the segments: either with the Delete button in the Annotation bar on the keyboard. The layer will be removed together with all its segments. You can also select several layers by clicking with the Ctrlkey on the keyboard.
How to modify order and height of annotation layers

Click on the layer’s name and drag it up or down towards the desired position. The size (height) of the layer can be changed by clicking on the bottom border and resizing it to the desired height (you can also hide layers by double-clicking on the layer’s name).
How to copy (duplicate) a whole layer

In order to duplicate layer click Duplicate Layer in the Annotation bar. The duplicated layer contains all all segments and properties of the original layer.
How to switch on/off the Waveform or Spectrogram display
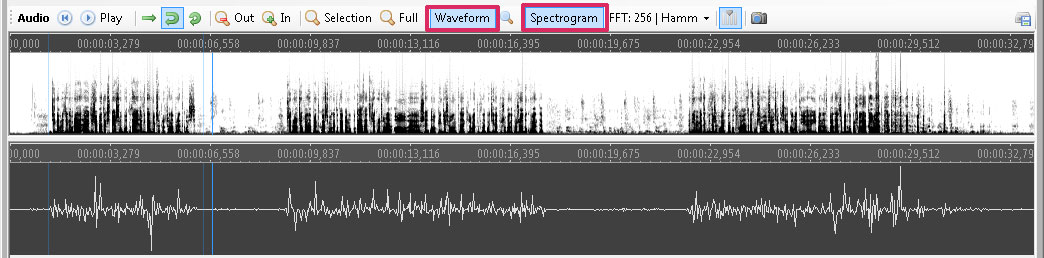
Waveform and Spectrogram display can be switched on and off with the Waveform and Spectrogram buttons in the Audio bar (top of the programme’s window).
How to annotate with the use of the Graphical Feature Space
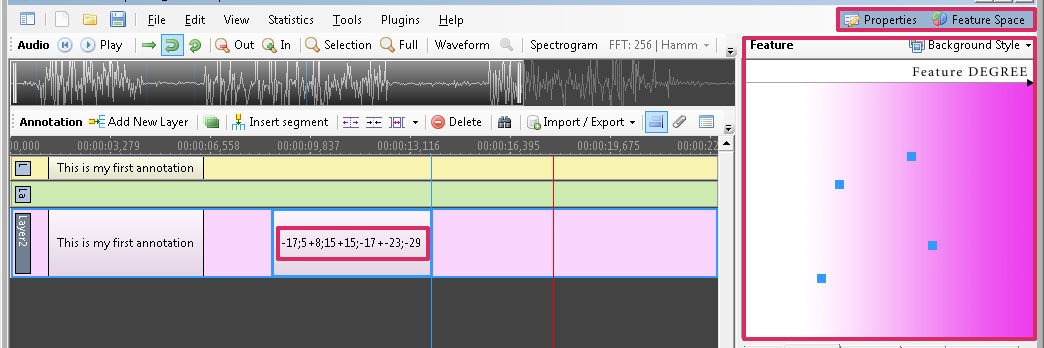
Feature Space is a tool for annotation with the use of continuous rating scales (as well as combination of both continuous and discrete scales). In order to use this functionality you need to go to the Properties panel on the right (Properties button in the top right corner) and switch on the Feature Space panel. The Feature Space is a graphic control with a Cartesian coordinate system. you can use one of the existing pictures for background feature space representations or add one of your own’s. After clicking on the picture a segment is automatically added on the selected layer with two Cartesian coordinaties. If a segment was selected before clicking on the graphical representation, its label will be replaced by the coordinates. When you click on the picture with the Ctrl key on the keyboard, you can add several points within one segment.
How to import a layer from a text file
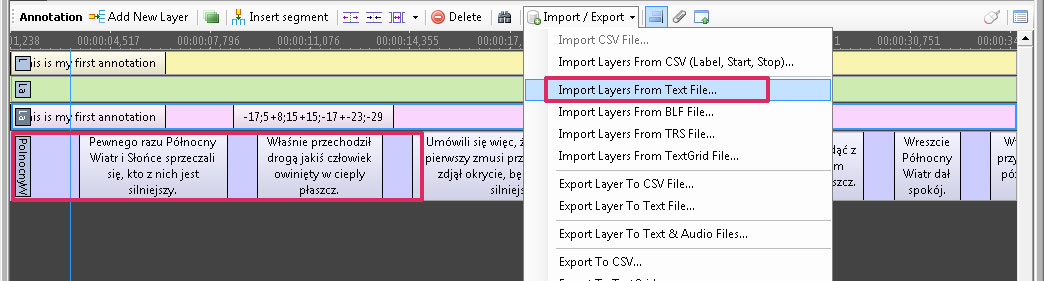
Choose Import Layers From Text File from the Import / Export menu in the Annotation bar (middle of the programme’s window). The programme will create a new layer named the same as the name of the imported file. Each line (verse) of the imported file will be added as a new segment. The segment’s length depends on the number of charts (letters) in the text. Average duration was set to default of 80 ms per a chart.
How to import a layer from a spreadsheet (or a CSV file)
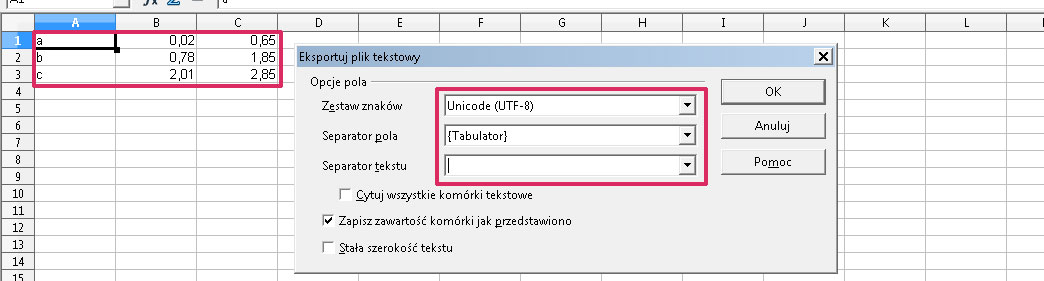
Annotation data can be imported from CSV files and spreadsheets. The data need to be organized into rows and 3 columns: Label, Start, Stop. Start and stop need to be given in seconds. In order to import data from a spreadsheet, you need to first export your data from the spreadsheet to the CSV format (save spreadsheet as CSV).Please, check regional settings of your operating system. If your decimal separator is set to a full stop, then you also need to set it the same in Annotation Pro’s settings (default). If your decimal separator is set to a comma, then you need to adjust settings in Annotation Pro to a comma as well. While exporting data from e.g. Open Office you also need to set font encoding to UTF-8 and choose {Tab} as field separator, the text separator should be left empty.
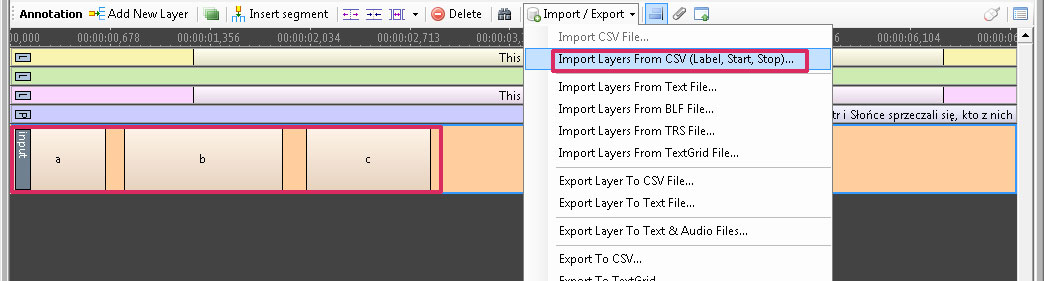
Then choose Import Layers From CSV (Label, Start, Stop) from Import / Export menu in the Annotation bar. All rows of the spreadsheet will appear on the newly added layer as new segments. The layer will be named the same as the name of the imported CSV file.
How to export a layer or all layers to a spreadsheet
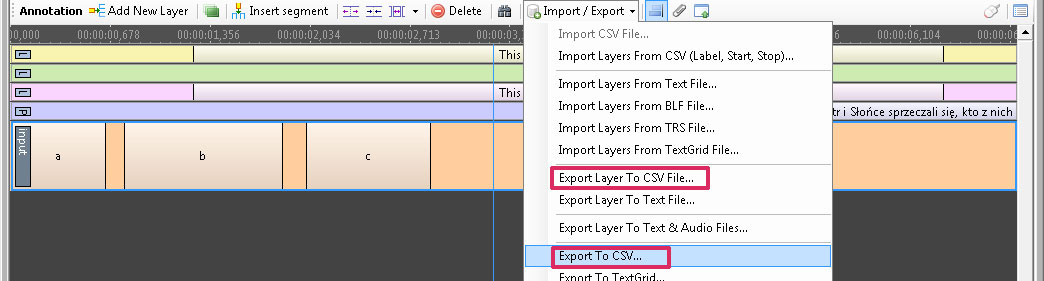
It is possible to export a selected annotation layer or all layers to a CSV file (and then to a spreadsheet). In order to export your annotation, choose the Import / Export menu in the Annotation bar (the middle of the programme’s window). Export Layer To CSV File option – exports the selected layer. Export To CSV exports all annotation layers. The resulting CSV file can be then easily opened in any spreadsheet, e.g. Excell, OpenOffice. The exported data file contains a number of additional columns providing various types of information (e.g. segment durations in samples and in miliseconds etc.), the unnecessary columns can be removed.
How to save and open annotation

Annotation can be saved at any moment as the *.ant file. In order to save your data, click Save in the top button bar or choose File / Save from the File menu or use the keyboard keys combination Ctrl + S. When saving the data for the first time, choose the destination folder and type in the file name. After saving annotation data, the file name will be displayed at the top of the programme’s window. The *.ant file can be opened by clicking on the Open button in the top File bar or by choosing File / Open from the File menu or simply by using the Ctrl + O keys on the keyboard.
How to create a Workspace that includes a collection of annotation files
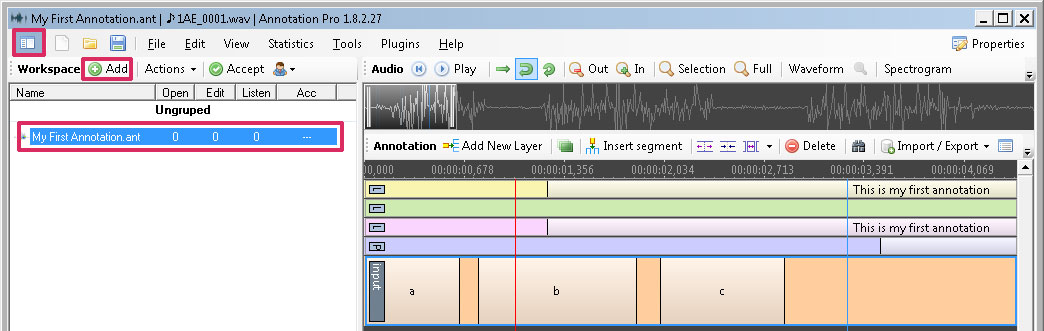
Open the Workspace panel by clicking the Workspace button in the top left corner of the programme’s window. Then click the green Add button in the Workspace bar, select our *.ant file from the its disk folder, and open it. The file name is displayed in the list in the Workspace panel. You can add many files to the same Workspace and navigate between them by double-clicking on the file names. When we want to save our data we need to save an *.antw file which is our Workspace file (containing information about all the files included in the collection). you can then open the Workspace by clicking the Open button in the File bar or by selecting File / Open from the File menu, or simply by using Ctrl + O keys combination.